
These tops with the huge tacked sleeves are self-drafted. You can make a top with the tacked sleeves using a pattern stash. There are no challenging steps or tricky techniques. You must try it!


This is a wrap top version.


I see shirts with tacked sleeves very often, so I wanted to make such a top. However, I couldn't find a similar pattern🙀 I have already some top pattern stash that I drafted myself, so I changed their sleeve design. It was easier than I thought! All you need only your long sleeve top pattern (and a whole bunch of fabric, notions and elastic!), but still you can make it without the tack sleeve pattern. I want you to try it next time you place your sleeve pattern pieces on your fabric. Here is the instructions.
CUTTING INSTRUCTIONS↓

How to make a tacked sleeve.
SEWING INSTRUCTIONS↓


First, make an elastic casing at the edge of the sleeve. Divide the sleeve into four blocks from the underarm to the cuff. Pin the sleeve, spaced evenly based on the four blocks. Make sure the pins are spread around the sleeves. (10-12 pins)


Pinch the fabric like the picture and then keep it in place with a pin. (1inch = 2.5 centimeter)


Pin around the sleeves. Check the length of the sleeves before sewing.

If it's too much hassle to follow the steps, I recommend Simplicity 8644 (but I think it's NOT difficult to make).


If it's too much hassle to follow the steps, I recommend Simplicity 8644 (but I think it's NOT difficult to make).
The top has a close-fitting bodice with front tucks and bow. (Pants: Alexandria Peg Trousers by named clothing) I made the top and the bow using linen. Next time, I would like to make a dress version with the tacked sleeves.


This top was the first time I made a top with tacked sleeves. To be honest, I just winged it. I didn't spend much time on making this but I love it!

The raglan pullover has a elastic at neckline, and tie-belt. (Cotton pants: Vogue 8909). The top was easiler and faster to make than the wrap version. It took around 8 hours.
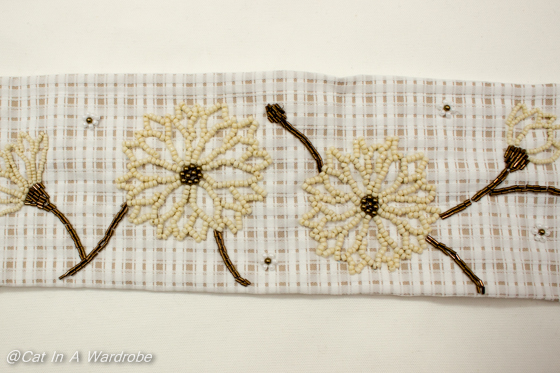

I used Italy polyester and made the matching obi-belt (which means kimono belt) with bead embroidery. I'm not really good at embroidering but I stitched it in a way that felt right without a design.

If you try to make a tack sleeve top, I recommend using fabric that doesn't wrinkle easily, because it's difficult to iron the sleeves. I made two tops using linen and polyester, and these fabrics hardly show wrinkles. I think it's good if you use velvet and wool too. I really like the sleeve design, and will make it again for fall or winter. They are perfect tops for me!

Just one thing! I think the sleeve looks like the green caterpillar from the movie "A Bug's Life" 😅
Have a great week everyone!
Total Time Spent (Not include cutting time) : Wrap Version 11 hours, Raglan Version 8 hours
Fabric: Wrap Version 60" 2 1/4yd, Raglan Version 60" 1 3/4yd


Thanks for posting the instructions. All these big fancy sleeves seem to be in fashion this season. I think they look great, but I don't know if they are for me, mainly because I don't like long sleeves much :)
ReplyDeleteThank you for commenting betty! I am very pleased. I will post other instructions of the tops on the blog:)
DeleteYour embroidery on that belt is beautiful. Of course I love the shirt also.
ReplyDeleteThank you so much Josephine! I would like to lean embroidery more! But I don't have much time ( ´ⅴ`)
DeleteWhat a great idea, it gives the sleeves more texture and makes the shirt more eye-catching! I think I'll make tacked sleeves in the next version of the タック入りシャツ I'm planning to sew (yes, I want more versions of that shirt, it's comfy and can be worn in many ways! *^v^*).
ReplyDeleteAlso, the embroidered belt looks original, a great addition to the blouse. It reminds me of the embroideries I used to make in the past, if only I had time to go back to it someday... ^^*~~
Thank you for your sweet comment Joanna! I really think you're good with your hands, and you can make a great shirt I want to try Sashiko embroidery to my kimono (like you!). However, I don't have much time to make new kimono ┐(´д`)┌
DeleteGreat idea, Eli. Love this top and lovely to read how to make the sleeve tack.
ReplyDeleteThank you very much Hana! I am glad that you like it:)))
DeleteSo gorgeous and thanks for the tutorial.
ReplyDeleteThank you Faye! I didn't explain it clearly enough. Howevr, I am glad that you said that:)
DeleteBeautiful tops Eli! Thanks for the great instructions. I'll bookmark for reference xx
ReplyDeleteThank you for your lovely comment Diane! You are so kind:)
DeleteBoth tops look so beautiful. I love the sleeves design; this look is in fashion right now.
ReplyDeleteThank you so much Olivia! Oh yes, I've seen a dress with tacked sleeves at ZARA.
DeleteGreat idea and both tops look super cute! The embroidered obi belt coordinates beautifully with that top and you did a great job on the beading. Had to laugh at your caterpillar thought! :)
ReplyDeleteThank you so much Lisa! I don't like Caterpillars, but he's so cute! (she?) If I make the sleeve design again, I never use green fabric:P
DeleteYou make it look so easy! What a wonderful way to create variety with the sleeves! Amazing job!
ReplyDeleteThank you for your sweet comment Vanessa! I enjoy seeing your work of MMM😊
DeleteWhat an interesting technique! The sleeves look great.
ReplyDeleteThank you for reading my blog! I am pleased🌸
DeleteYour tops look great on you and thanks for sharing how you did it.
ReplyDeleteThanks a lot Vicki! I am glad you said that😊
DeleteYes! I knew the sleeves reminded me of something - a caterpillar - you are right :) :). I do like the way you make two garments of the same design in quite different fabrics - here you have two very different moods, the very natural one (delightful embroidery) and the lovely patterned gingham - crisp and smart.
ReplyDeleteThank you for your lovely comment Sarah! I don't like caterpillars, so I won't to make the top using green fabric😓 However, I love the sleeve design. I really enjoyed embroidering and want to lean it more.
Deletefabulous! thank you for the tutorial
ReplyDeleteYou're welcome M-Bio Porasi! I'm pleased😊
ReplyDeleteI love your sleeves - they look like an accordian to me! For making sleeve music with. Thanks for sharing the instructions and fabric-that-needs-no-ironing warning! Such a practical tip :) and your tops look gorgeous on you. I really love the way that the wrapped linen top falls. (Slouchy from SPR)
ReplyDeleteThank you for your lovely comment! I'm glad that you found my blog:) Making these sleeves were not difficult to make. If you have any question, please feel free to ask me.
DeleteThank you for your clear instructions, very inspiring!
ReplyDeleteThank you for reading my blog! I am pleased:)
DeleteLove both versions of your tack sleeve tops. Thanks for providing instructions on how you did this.
ReplyDeleteThank you Linda! I am glad you said that😊
Delete